OpenHaldex
Free Haldex AWD control anyone can build for about $50.
The official OpenHaldex project from Bored Systems for VWAG Haldex AWD vehicles.
It runs on the $35 LILYGO T-2CAN, with no wiring expertise or solder required.
It installs from this website. AWD tuning maps, automatic behavior profiles, and much more.
Free firmware · About $50 in parts · Six board connections · NO SOLDER · No coding · No subscription
There is no controller to buy from us. You buy the board and factory-style connector pair, build a simple inline harness, click Install, and plug it into the car.
Official OpenHaldex SS website, documentation and installer. Developed and maintained by Bored Systems.
The Straight Answer
What does it do?
It lets you decide when and how strongly the rear axle engages using maps, fixed modes or automatic rules built from the car’s own live signals.
What does it cost?
Usually about $50 in parts: a roughly $35 LILYGO board plus the correct factory-style connector pair. The software is free.
How hard is it?
Match six labeled board connections, tighten them with a small screwdriver, install the firmware in a browser, and plug the inline harness into the car.
Does OpenHaldex Work With My Car?
If it is a Volkswagen Group vehicle with conventional Haldex AWD, yes.
OpenHaldex SS supports Gen 1, Gen 2, Gen 4 and Gen 5 Haldex AWD
Volkswagen, Audi, SEAT, Škoda and Cupra vehicles.
Common examples include the VW R32, Golf R, Tiguan, Atlas/Teramont, 4Motion SportWagen and Alltrack; the Audi A3, S3, RS3, TT, TTS, TT RS, Q3 and RS Q3; and equivalent SEAT, Škoda and Cupra Haldex AWD models.
Not currently supported: the newer torque-splitter / torque-vectoring rear differential used by the Mk8 Golf R and 8Y RS3. Those are different AWD systems.
Manual transmission? Supported. Some manual platforms do not broadcast selected gear, so that one signal may not be available in the Behavior Editor. AWD control and the other vehicle signals still work normally.
What OpenHaldex Does to Your AWD
Use it like a simple mode controller, or build AWD behavior around the way the car is actually being driven.
AWD maps you can actually shape
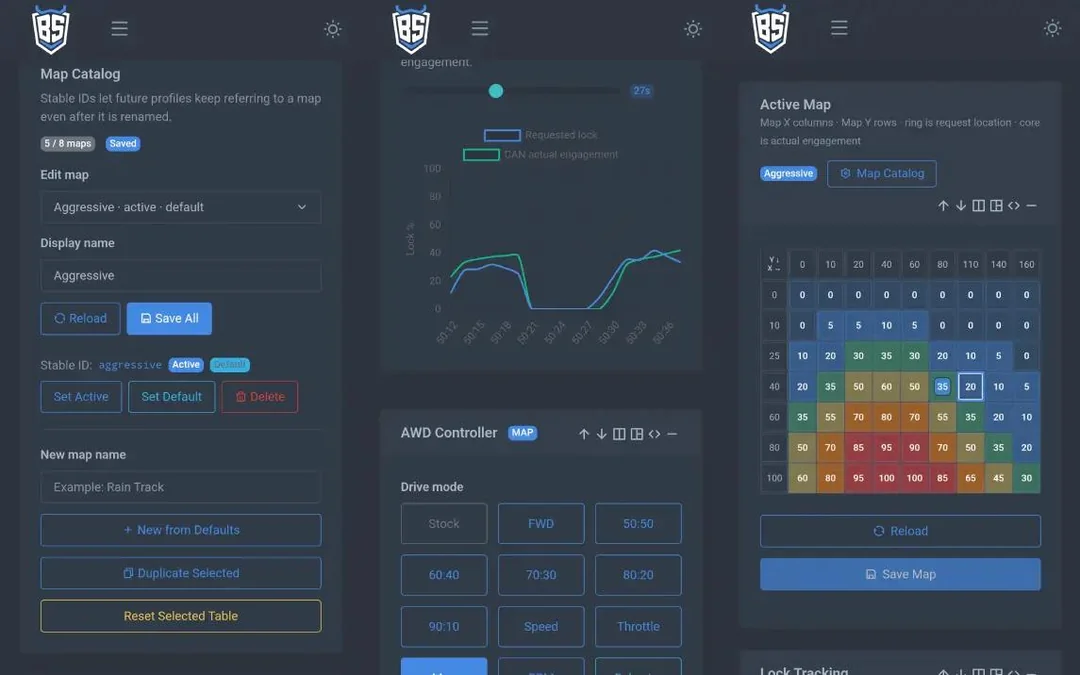
Choose how much rear-drive request you want across a two-axis table. Use speed and throttle, RPM and throttle, wheel speed, steering angle or other decoded signals available on the vehicle.
- Editable map cells and axis values
- Smooth interpolation between cells
- Live active-cell tracing
- Save, load, import and export maps
Automatic behavior profiles
Build rules from live CAN signals so the car can change AWD behavior without you opening the dashboard or reaching for another switch.
- Up to 8 named profiles and 24 rules
- One or two conditions per rule
- Priority order and exclusive matches
- Manual profile pinning when wanted
Simple modes when simple is enough
- Stock: pass factory traffic through unchanged
- FWD: remove the OpenHaldex rear-drive request
- Fixed lock: select a requested lock preset
- Curves: request lock from speed, throttle or RPM
Factory-style diagnostics built in
- Identify the connected Haldex controller
- Read and clear supported fault codes
- Read supported measured values over KWP or UDS
- Calibrate requested output to the connected unit
- View decoded CAN signals and download session logs
Developed by a VW/Audi factory chassis/electrical/network diagnostic specialist technician.
OpenHaldex is built from OEM diagnostic behavior, raw CAN captures, real decoded VAG signals and real Haldex vehicles; not assumptions.
See OpenHaldex Work
Build and edit AWD behavior in minutes
Why maps instead of permanent 50/50?
A permanent fixed-lock mode keeps a high request active regardless of actual demand. A map lets requested engagement and the resulting pump demand rise and fall with throttle, speed, RPM and other driving conditions.
That is the design goal: aggressive rear-drive response when it helps, with time at lower request instead of holding the pump and clutch pack at constant pressure.
Build OpenHaldex
No, really. The electronics job is six board connections.
If you can match labeled wires and tighten a small screw terminal, you can build this.
There is no coding, no soldering to the car and no factory wire cutting.
Buy prewired connector pigtails for the easiest build, or crimp the OEM terminals yourself.
What you need
- LILYGO T-2CAN ESP32-S3 (usually about $35)
- Gen 1 connector pair: 1J0-973-714 and 1J0-973-814
- Gen 2 / 4 / 5 connector pair: 1J0-973-713 and 1J0-973-813
- A small screwdriver.
Prewired connector pairs are commonly available for less than $20. Used OEM connectors from a salvage vehicle work just as well when the terminals and seals are in good condition.
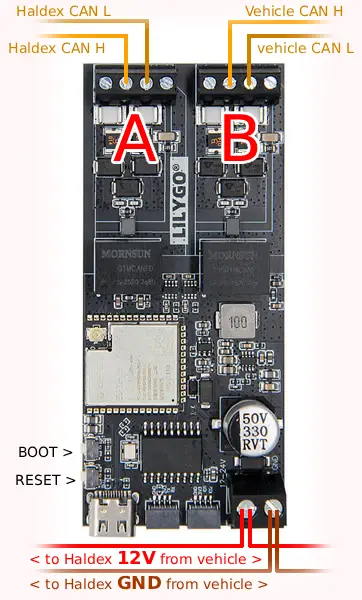
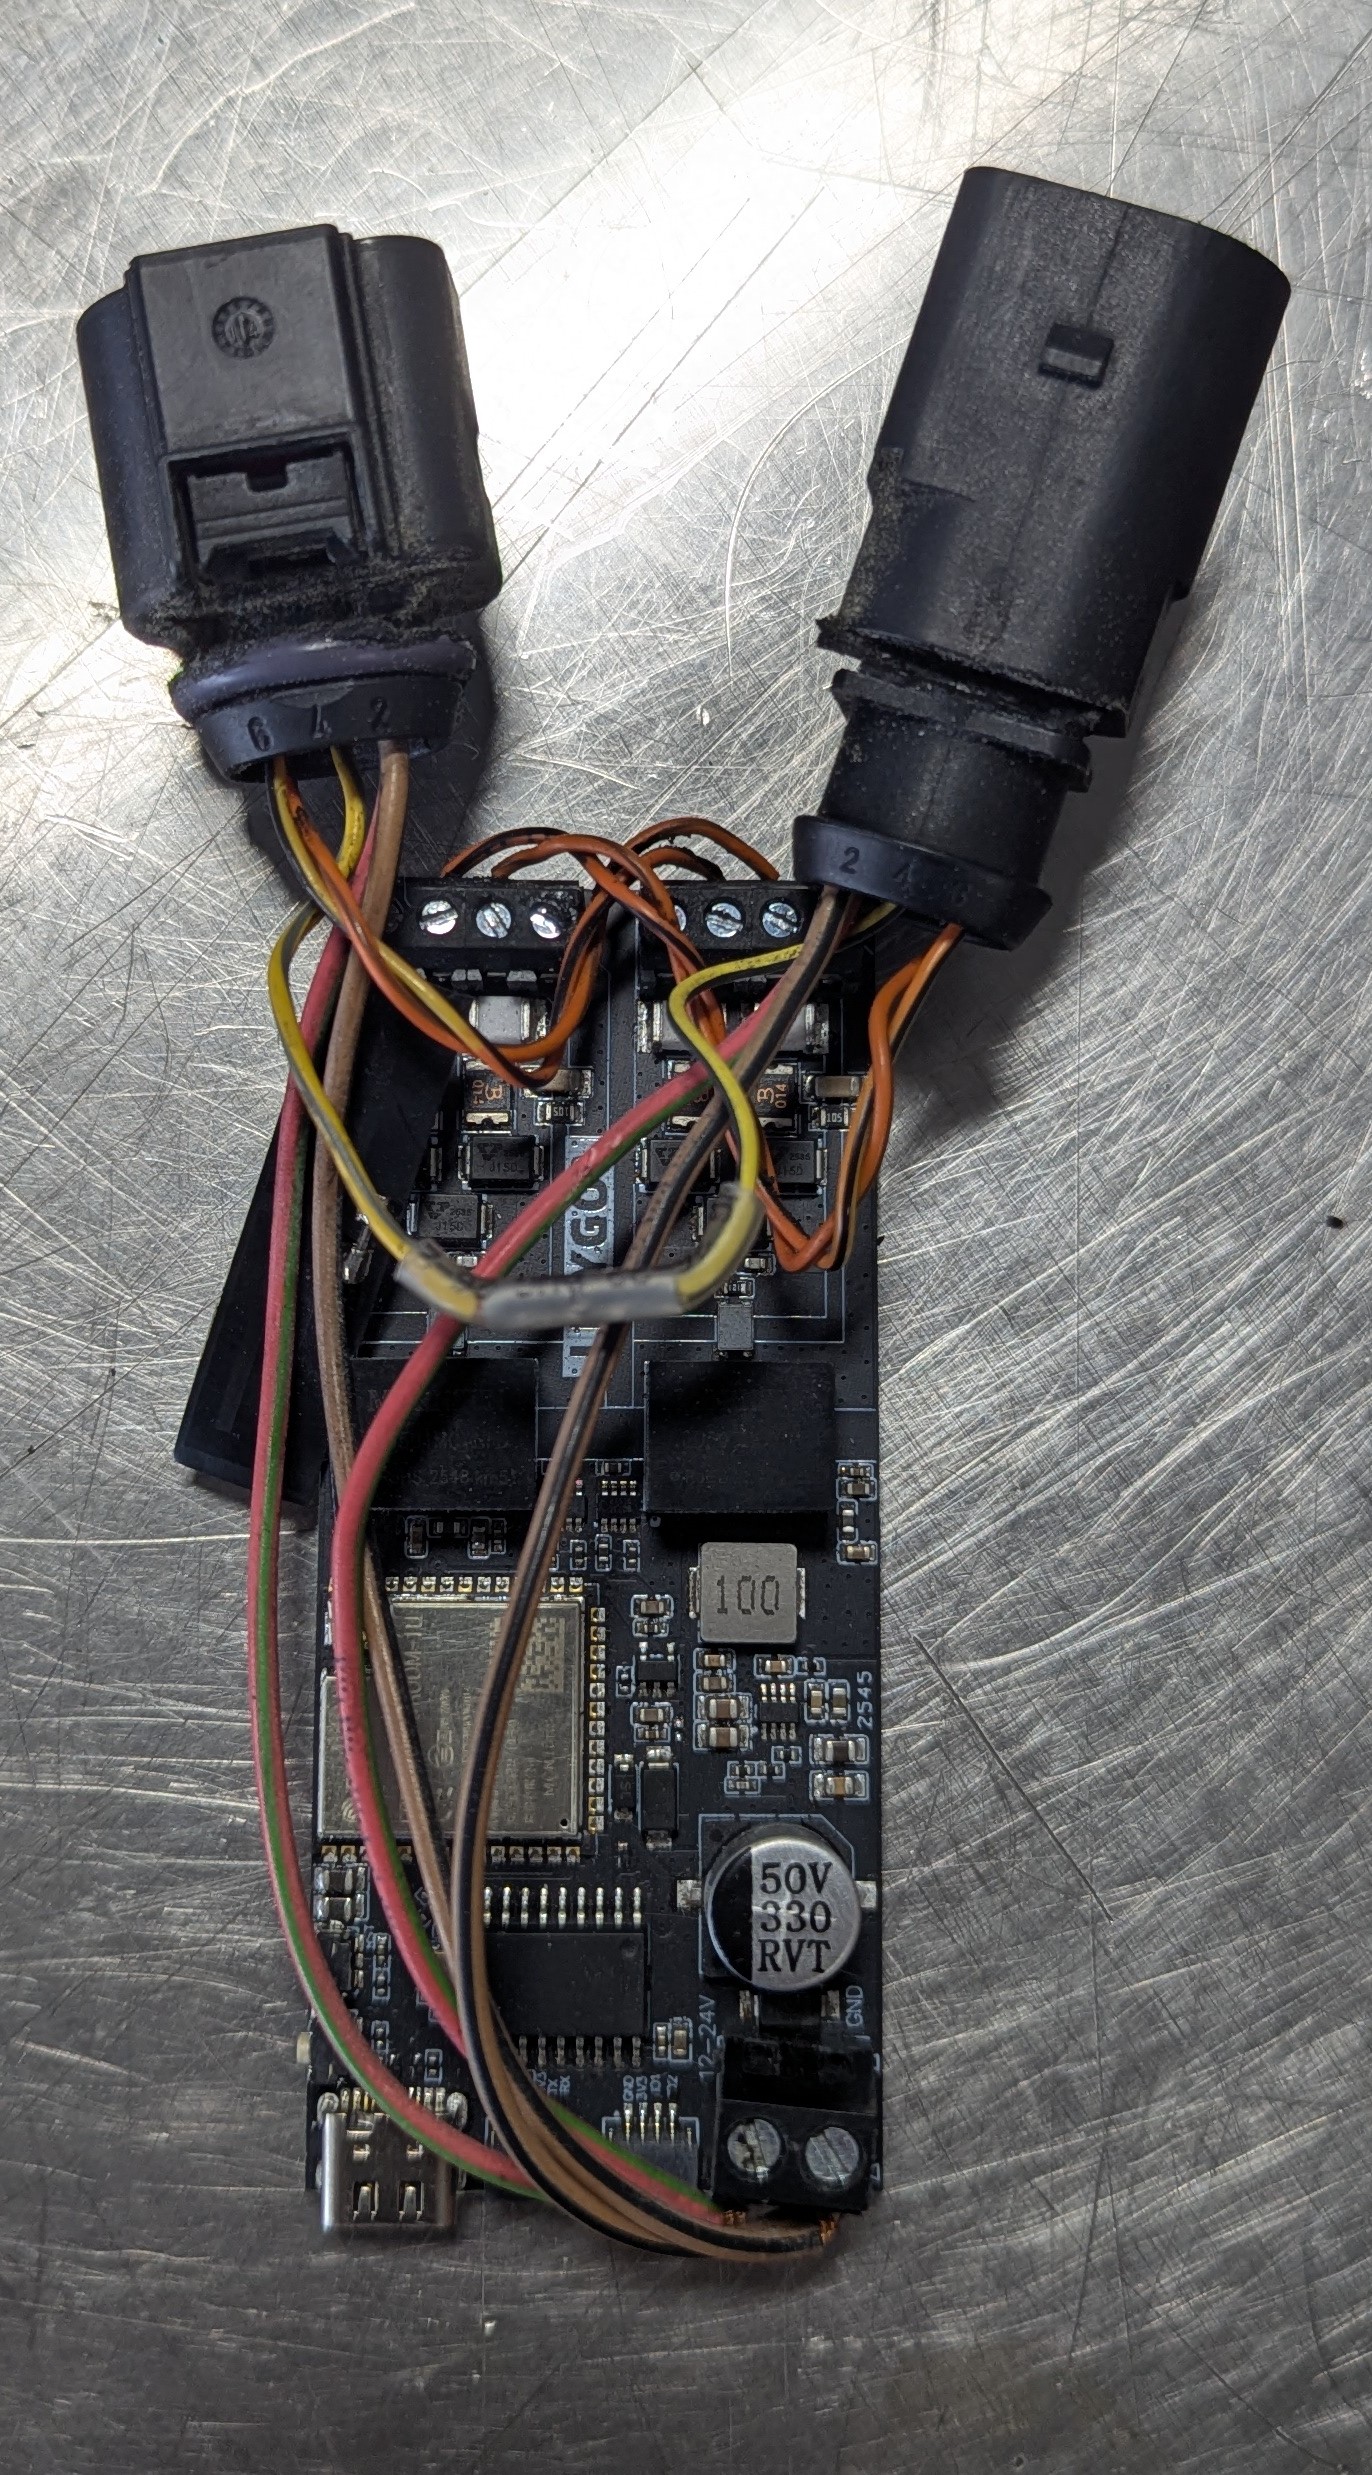
Simple wiring layout
Haldex side → CAN A
CAN High → CANHA
CAN Low → CANLA
Vehicle / chassis side → CAN B
CAN High → CANHB
CAN Low → CANLB
Power
Fused 12V → 12–24V
Ground → GND
Power, ground and non-CAN signals continue through the inline harness. Keep both CAN pairs twisted as long as practical and match connector cavity numbers, not wire colors alone.
Basic Wiring Instructions
Open the section for your Haldex generation. The board only touches power, ground and the two CAN pairs. Every other populated circuit passes straight through from the vehicle connector to the same cavity on the Haldex connector.
Connector that plugs into the vehicle harness: 1J0-973-814
Connector that plugs into the Haldex module: 1J0-973-714
| Vehicle-side cavity | Connection |
|---|---|
| 1 Term 15 | Pass through to Haldex cavity 1; use the correct verified fused source for board 12–24V |
| 2 Ground | Pass through to Haldex cavity 2 and branch to board GND |
| 3 Brake light | Pass through to Haldex cavity 3 |
| 4 Handbrake | Pass through to Haldex cavity 4 |
| 5 K-line | Pass through to Haldex cavity 5 |
| 6 | Not used |
| 7 Chassis CAN Low | Board CANLB |
| 8 Chassis CAN High | Board CANHB |
| Haldex-side cavity | Connection |
|---|---|
| 1 Term 15 | Pass through to vehicle cavity 1 |
| 2 Ground | Pass through to vehicle cavity 2 |
| 3 Brake light | Pass through to vehicle cavity 3 |
| 4 Handbrake | Pass through to vehicle cavity 4 |
| 5 K-line | Pass through to vehicle cavity 5 |
| 6 | Not used |
| 7 Haldex CAN Low | Board CANLA |
| 8 Haldex CAN High | Board CANHA |
Gen 1 note: the reference LILYGO board does not include K-line diagnostic hardware. The K-line still passes through so the vehicle retains its original circuit.
Connector that plugs into the vehicle harness: 1J0-973-813
Connector that plugs into the Haldex module: 1J0-973-713
| Vehicle-side cavity | Connection |
|---|---|
| 1 12V power | Pass through to Haldex cavity 1 and branch to board 12–24V |
| 2 Ground | Pass through to Haldex cavity 2 and branch to board GND |
| 3 Brake | Pass through to Haldex cavity 3 |
| 4 Chassis CAN Low | Board CANLB |
| 5 Chassis CAN High | Board CANHB |
| 6 | Not used in this layout |
| Haldex-side cavity | Connection |
|---|---|
| 1 12V power | Pass through to vehicle cavity 1 |
| 2 Ground | Pass through to vehicle cavity 2 |
| 3 Brake | Pass through to vehicle cavity 3 |
| 4 Haldex CAN Low | Board CANLA |
| 5 Haldex CAN High | Board CANHA |
| 6 | Not used in this layout |
Connector that plugs into the vehicle harness: 1J0-973-813
Connector that plugs into the Haldex module: 1J0-973-713
| Vehicle-side cavity | Connection |
|---|---|
| 1 Ignition / Term 15 | Pass through to Haldex cavity 1 |
| 2 Ground | Pass through to Haldex cavity 2 and branch to board GND |
| 3 12V power / Term 30 | Pass through to Haldex cavity 3 and branch to board 12–24V |
| 4 | Not used |
| 5 Chassis CAN Low | Board CANLB |
| 6 Chassis CAN High | Board CANHB |
| Haldex-side cavity | Connection |
|---|---|
| 1 Ignition / Term 15 | Pass through to vehicle cavity 1 |
| 2 Ground | Pass through to vehicle cavity 2 |
| 3 12V power / Term 30 | Pass through to vehicle cavity 3 |
| 4 | Not used |
| 5 Haldex CAN Low | Board CANLA |
| 6 Haldex CAN High | Board CANHA |
Gen 5 note: Term 30 may remain powered after ignition-off. Enable the SS Power Save setting after initial setup.
Before you connect it to the car
- Confirm every pass-through wire connects the same cavity number on both connectors.
- Confirm 12V is not shorted to ground.
- Confirm Haldex CAN is on CAN A and chassis CAN is on CAN B.
- Confirm CAN High and CAN Low are not reversed.
- Tighten the screw terminals, secure the wiring and install the board in an enclosure.
- If desired, secure screw terminals with purple or blue thread lock.
Install the Official OpenHaldex SS Firmware
One-click USB web installer
- Connect the LILYGO T-2CAN to a computer with a USB data cable.
- Open this page in Chrome or Edge.
- Click Install and select the board’s serial port.
- Leave the USB cable connected until the board finishes and restarts.
Current release: OpenHaldex SS v1.0
LILYGO T-2CAN ESP32-S3 N16R8
This installer downloads the official Bored Systems build directly from openhaldex.dev. No account, registration, coding or development tools are required.
Release metadata · Release notes · Verify checksums · Software terms · Third-party notices
Already running another application? Installing SS replaces the application currently on the board. Export anything you want to keep first.
Plug It Into the Car
Common Gen 2 / 4 / 5 installation
- Switch the ignition off.
- Lift the rear seat and locate the factory Haldex inline connector.
- Unplug the factory connection.
- Plug the OpenHaldex harness inline.
- Secure the controller and wiring so they cannot move or chafe.
Gen 1 uses its 8-pin connection at the Haldex unit, so the controller harness is routed from that connector rather than simply sitting under the rear seat.
First startup
- Join the SignalScope-AP Wi-Fi network.
- Open openhaldex.local or 192.168.4.1.
- Select the Haldex generation and save.
- Start in Stock mode and confirm live vehicle signals.
- Run the supported calibration workflow.
- Load a supplied map or create your own.
You do not have to understand every advanced feature to use OpenHaldex. Pick a mode or supplied map first. The maps, profiles, diagnostics and CAN tools are there when you want them.
Completely reversible
OpenHaldex uses an inline connector harness. To return the vehicle to its original wiring, unplug OpenHaldex and reconnect the factory connector. No factory wire was cut or permanently modified.
Questions People Actually Ask
You do not purchase OpenHaldex from us. The firmware is free. Buy a LILYGO T-2CAN N16R8 and the correct factory-style connector pair, build the inline harness, then install OpenHaldex SS from this page.
Nowhere. OpenHaldex does not require an account, subscription, activation code or paid feature tier.
The board needs six connections: power, ground, Haldex CAN High/Low and chassis CAN High/Low. With prewired connectors, the build is matching labeled wires and tightening screw terminals. No code compilation is required.
No. The intended build uses an OEM-style inline connector pair and the LILYGO screw terminals. Bare connector shells require normal terminal crimping, but the factory vehicle harness is not cut or permanently modified.
Yes. Transmission type does not change Haldex support. Some manual vehicles do not broadcast selected gear, so native gear may not be available as a profile input. Speed, RPM, throttle, wheel speeds and other available chassis signals can still be used.
Not currently. Those vehicles use a newer torque-splitter / torque-vectoring rear differential rather than the conventional Haldex AWD system supported here.
Yes, when the signal is available in the selected vehicle package. OpenHaldex can use decoded chassis signals as map inputs, profile conditions or dashboard values. Always confirm a signal in the live view before building behavior around it.
The controller will be on the wrong side of the inline gateway and AWD communication will not work correctly. Put the Haldex module on CAN A and the vehicle/chassis on CAN B, then confirm Stock-mode communication before enabling control.
Any more aggressive AWD strategy can increase system use. OpenHaldex is designed around mapped and condition-based requests instead of requiring permanent fixed lock. The developer’s R32 fluid remained clear after roughly 10,000–15,000 miles of use, with no visible clutch contamination. That is useful real-world evidence, but it does not measure pump life or guarantee zero wear.
A fixed lock request is available, but maps and profiles are usually the better tool. They can add rear-drive request when it helps and reduce it during cruising, low-speed turning or other conditions where constant pressure is unnecessary.
Yes. Unplug the OpenHaldex inline harness and reconnect the factory Haldex connector. The factory wiring path is restored immediately.
OpenHaldex SS is distributed and supported through this website and the OpenHaldex community. OpenHaldex-S3 is a separate MIT-licensed Bored Systems project with its own releases and public GitHub repository.
Use the official OpenHaldex community on Reddit. Public build questions and working configurations help the next person instead of disappearing into a private support message.
Follow the Project and Join the Community
Build reports, feature demos, real-car testing and new documentation are posted through the OpenHaldex community and Springfield Imports channels.
Ready to Build It?
Buy the board and connectors, make the six board connections, then come back here and click Install.
Project note: OpenHaldex began as a community open-source project in 2018. OpenHaldex SS is a separate Bored Systems implementation built using work developed through the OpenHaldex-S3 and SignalScope-S3 projects. Deeper engineering and project information lives at Bored Systems.
OpenHaldex SS is an independent Bored Systems project and is not affiliated with or endorsed by Volkswagen Group, Audi, Haldex, BorgWarner, LILYGO or their respective owners. It changes AWD behavior; install it correctly and use settings appropriate to the vehicle and conditions.